Feeds:
Posts
Comments

Cardboard fun

In this ever-changing adventure of being a parent, I’ve tried to come up with fun, creative ways to play with my kiddo. Because, quite frankly, if I don’t, I’d never make it. My son happens to be a loud, fun-loving, super-energetic, never-a-moment-of-quiet kind of kid. Keeping him busy is of utmost importance! Over the past year or so I’ve slowly compiled some fun items and ideas that I pull out once in a while. Of course, Pinterest is always a good backup, but this I actually happened to come up with on my own, people! 🙂 It was a random decision I made one day because I had a large cardboard box that my kiddo had been playing in for a few days, but it was starting to get a little too floppy. So, I decided to cut it open, lay it flat, and give him some crayons. (Obviously, I did a lot of Sharpie doodling, too.) The first day or so it looked like this. He LOVED it! As you can see, it took up most of our living room floor space.

Image

But, like I said, he loved it, and it sure kept him entertained so I wasn’t about to get rid of it right away! It ended up hanging out on our living room floor for a little over a week.

image

(Sorry for the teensy-tiny picture – I tried and tried, but it just wouldn’t cooperate.  If you want to see it a little bigger, just click on it and it will open up.)

I love it when little things turn out to be the big things! The hubs and I even had fun with it, and even though we were ready to have our floor back, we all missed it when it was gone.

Don’t forget to make the most of life. Right now, re-using and re-purposing items is the “thing”, but more than that, this idea reminded me how the simple things in life can really be the most enjoyable. Take a minute to evaluate how you spend time with your kids… doing big, exciting things isn’t bad, but make sure you do little things too. Like letting a cardboard box take over your living room for a week, and turning it into your own unique floor mural! (I don’t think it’s called a mural when it’s on the floor, but right now I can’t figure out what the proper term is! Ha!)

Whatever you do, I hope you have fun with it and join in – your kids will think you’re awesome!

One thing at a time

So, what have I been up to?  Nothing much.  Everything. Our lives are pretty normal and routine; they’re crazy and anything but boring.

Isn’t that how life seems to go?  Have you ever felt like you’re just getting by – doing everything, going in all directions, using up every possible minute, and yet, you have nothing to show for it?  Like you’re just living day-to-day, the same mundane routine, over and over.  Overwhelmed by the ever-present to-do’s.

Maybe you don’t, but I get that way sometimes. My work load at my job has increased, we try to participate in every church activity we can, and we have a growing, very active boy.  Keeping up with routine is what gets me through from day to day right now.  I’m a bit of a perfectionist, and though I have come a long way in “embracing the chaos“, I still have my limits!  I’m not quite so spastic about keeping things in impeccable order, but there are some things that still drive me bonkers: a cluttered kitchen table (the bane of my existence), laundry on the floor (apparently, the bathroom floor makes a dandy laundry hamper), and dirty sinks… there are more, but those are the main ones. 🙂

So, a few weeks ago, I started to do something that has helped me keep a handle on things without getting overwhelmed.  It may be overly simplistic to you, so if you’re way ahead of this, my apologies!   I’m just one girl trying to catch up with the rest of you!

Anyway, what I started doing was just adding one thing — one — to my routine in the evenings.   I don’t mean that I add on a new one every night and end up with a longer and longer list each night.  The whole point here was for me to cut down on the crankiness and stress!  I just got the basic stuff done and then I picked one more “big” chore to do.  Like clean one bathroom, or file, or tackle the 15 loads of laundry that have been piling up all week.  Thankfully, I have a husband who is willing to help, so sometimes I actually get more done, depending on what else is going on that evening.

I tend to leave certain things until Saturday to work on because I’m tired at the end of my day.  But seriously, who isn’t?   Then my Saturday (the one day I get to stay home – and the day that I try to devote to concentrate on being a mother more than housekeeping) is completely eaten up with stuff that cannot be put off.   And there goes the whole day, wrapped up in laundry and shower scum. (That sounds so gross – but I think some of you can relate.)

At first, this “one thing at a time” idea was slow-going, because, lets be honest – doing ONE thing doesn’t have much of an impact.  However, by the end of my first experimental week, I had noticed a few things: usually that one extra chore took a max of 30 minutes to complete.  Usually more like 15 minutes.  However, by the time Saturday rolled around, I had shaved off at least 2 hours of house work from my weekend.  Fantastic!  I was also less cranky and stressed because while things were not immediately immaculate, I was at least ahead of the curve when compared to “before”.  Also, my mentality changed a little bit.  I didn’t berate myself quite so much when I didn’t get a big list crossed off at the end of the day.  Because there wasn’t a huge list to begin with!  🙂  (If only life in general could be so easily de-cluttered!)

So, now it has been… ahem… several weeks, and I decided that today, my “extra” thing would be writing.  So, here I am, sharing my oh, so non-revolutionary thoughts.  If you read this far, thanks.  It was nice talking with you!

And just maybe, if you’re a worn out mommy trying to figure out how to get your mega-list checked off, the idea of chopping your list down dramatically for a few weeks might be a welcome idea.

P.S.  By the way I don’t want you to get the idea that my husband doesn’t help out – he actually does most of the bathroom cleaning at our house, he usually spends time with the kiddo while I make dinner, he is the primary put-the-kid-to-bed-er and grass-mower, and vacuum and diaper duty falls to him half the time as well – just to name a few things.  He can pretty much do anything… as long as we don’t count cooking. 😉

I’ve managed to try a few new recipes the past few weeks. Well, not entirely new, really. More like new twists on my favorite go-to recipes. But we’ll pretend they’re new, because that sounds so much better!

Anyway, I don’t do a whole lot of seafood stuff because I’m not all that great at it, and it smells and can be expensive. Oh, who am I kidding? It’s mostly because I’m not good at it. 🙂 I usually stick to shrimp and tilapia… and tilapia much more than shrimp. Ah, I’m so adventurous! Ha! One good thing about cooking tilapia over and over is that I have discovered that tilapia is pretty good any way you cook it! But this recipe happens to be a favorite.

Now, to be completely honest, I don’t measure for this recipe. So, all the measurements I list are approximate. 🙂

3-4 Tilapia fillets
1/4 cup of milk
1 cup corn flakes
1/2 tbsp season salt
1 tsp old bay seasoning
3-4 strawberries
1 mango
cookie sheet or shallow baking pan
cooking rack

Pre-heat the oven to 375.
Pulverize the corn flakes in a blender, and put in a shallow dish. Add the seasonings and mix.
Pour milk into another shallow dish.
Place the rack on top of the cookie sheet/baking pan.
Dredge the fillets in the milk, and then in the cornflake mixture. Sometimes I use a fork to scoop more breading and move the fillet around the dish. (Helps to keep my fingers a bit less nasty.)
Shake of a bit of the excess crust, and then place the fillets on the rack.
Bake for about 20 minutes or until the crust is golden brown.

While it’s baking, cut up the mango and strawberries. You can add a bit of cilantro or oregano if you like it.

I like to serve this on a bed of brown rice with a lemon wedge, and some veggies on the side.

mango strawberry with fish

Mangos are not always easy to find and can be expensive especially if you don’t live in a tropical climate. So, if that is the case, or if you just don’t like mango, you could use pineapple instead.

I have also made this fried on the stove, if you prefer that method. I just try to bake more than fry – rumor has it that it’s a healthier option. 🙂

Also, I have used raw oats in place of bread crumbs or corn flakes in a pinch. Just grind those oats up real well in the blender and you’re set! The flavor is a bit different of course, but I promise it doesn’t taste like oatmeal! My husband said he thought it tasted a bit like corn meal batter… I don’t know if I agree, but I do know that I liked it!

Embrace the chaos

I know – so much easier said than done! But seriously, once you have a child (or two, or three – but I only have one right now), you have to come to terms with it at some point, or you’ll go crazy. It’s been close to a year and a half since Little Man was born. And it has taken me nearly that long to look past the chaos which occasionally sometimes often besets my house. Somewhere in the recesses of my mind I knew that a baby would mean letting go of my need for a clean kitchen every night, ordered rooms, and squeaky clean bathrooms. But I still fought it. I still tried to keep everything picked up, and clean, and organized while at the same time feeding, playing, diapering, and bathing my baby. Not to mention working full-time. At the beginning it wasn’t such a terrible thing, since new babies mostly eat and sleep. I did have some time to work on things around the house at that stage. But once kids can move on their own – it’s a whole new world!

Don’t get me wrong, it’s a good thing to want a clean, orderly home. But there are limits, and for the sake of my sanity, the sanity of my husband, and the wellbeing of my child, I had to recognize that. Having clean floors every evening is not worth missing out on special moments or having a spat with your partner. Little Man is in such a fun stage right now. I love hearing him say “yay!” and clap when I walk in the door after work, seeing his excitement when he discovers how to work a zipper, watching his face as he absorbs Mickey Mouse Club House, or listening to his jabbering and giggles while he plays in a cardboard box. Those are the things that make life special. And he needs me to be there.

Yes, there are times when he just has to be patient while I finish dinner. We are working on the concept of picking up his toys when he’s done playing, and I usually sneak in some kind of chore while he’s playing happily with his books, but my focus is slowly improving. When I find myself getting irked about the laundry pile, dirty front porch, or toy-covered living room, I try to purposefully decide what is most important: getting things back the way I like them? Or spending some time with my Little Man? Am I being obsessive again, or does this really need to be done immediately? There are times when the laundry HAS to get done. For example, when he has peed through his last set of sheets and pjs, (We’ve been struggling with that lately because he has started pulling at his diaper, which loosens the tabs. Sigh.) or when the last towel was used that morning to rescue the carpet from spilled apple juice. But lots of times, it really can wait or a “good enough” version will suffice. Here are a few examples:

  • I’m not a dishwasher fan, but the one we have has definitely seen more use lately – and I’m so thankful to have it!
  • I detest leaving dirty dishes in the sink over-night, but it has happened more in the past 3 months than it has my entire previous married life.
  • A quick swish with the toilet wand and some cleaner can hold me over until I have time to properly clean the porcelain throne. Usually that means during nap time or after bed time.
  • Do we have clean undies? Yes? OK, then I can piece together an outfit for tomorrow if the laundry doesn’t get done.
  • Guests are coming over for dinner – time to make a decision. Do they have kids? If so, I just make sure they can tell I made an effort – they’ll understand if things don’t meet Good Housekeeping magazine cover standards. If they don’t have kids and I’m not particularly comfortable with them seeing my pigstye house in such a state, I pick up the random junk, put it in a laundry basket, and stuff the whole thing somewhere they won’t look. Horrible, I know. But it works. I manage to salvage a bit of dignity, and they are spared the challenge of overlooking the tornado alley that has replaced my living room.

I believe I reached a new level of “embracing the chaos” just last week when a friend came over with her two boys for a play date. I hadn’t had a chance to go grocery shopping, so lunch was a conglomeration of left overs. Chicken strips, apple slices with caramel, pizza, and some other bits and pieces I’d rather not talk about. It was a bit embarrassing, but, gracious angel that she is, my friend cheerfully complimented me on how I had seasoned last night’s chicken strips! Bless her soul! That’s a true friend, right there. Or maybe she’s been there herself, so she spared me what was really going through her mind. Whatever the case, it was downright lovely of her to say it!

Life is so much more than clean sheets and gleaming countertops. I don’t want Little Man to grow up thinking he has to be perfect or circumstances have to be perfect for me to be happy. The fact is, he isn’t perfect, and never will be. I’m not perfect and never will be either. So, I might as well learn to embrace the ensuing chaos, and be happy!

I’m sure you’ve heard tons of horror stories about what happens when babies start eating “real” food. Everything from, “And you thought you knew what stinky diapers were like!” to “You’re going to love cleaning up food spatter from your ceiling.”, to “My kid refused everything but applesauce for the first two years!” It’s enough to make you want to hire someone just to feed the kid!

baby-bjorn-plate-and-spoons[1]
Little did I know that those things were mostly true… but mostly fun. (Go ahead and Google “messy baby”.) You learn to laugh at the nasty diapers, carrot-stained walls, and crazy faces you never knew your little angel could make.

Thankfully, my kiddo had no trouble accepting solids. I’ve heard stories of children who refused to eat food at first, but A was reaching for my food by the time he could get his fingers to clamp on command.

I didn’t start offering him baby food until he was six months old. There are some people who are against the whole solids thing until about a year. But I felt he needed a little something extra than milk (he’s a big boy!), and our pediatrician encouraged it so we dove right in!

I won’t go into details about what little ones can and cannot eat, since I really don’t know a lot about it. What I can tell you is that there are a lot of websites out there that do have lists available that suggest age-appropriate purees and what to avoid (like nuts). Here is just one example. I did my research, and made sure I wasn’t doing anything ill-advised, but I didn’t get all paranoid about it either. I let him sample some of my tilapia when he was about 7 months old and he loved it! (Now, before you get all upset – I made triple-sure there were no bones and watched to make sure he didn’t have a negative reaction to it!)

This was my take on it:
In general (meaning there are a very few exceptions), fruits and veggies are fine as long as they are prepared in a way that your baby can eat them without choking. Our pediatrician told us to stay away from honey and nuts until one year, and after that, everything was fair game. If you ever have any concerns or questions, just give your pedriatician a call and ask! Sadly, no two pediatricians will have the exact same opinion on everything, so keep that in mind!

Start out slow, and introduce one thing at a time. Three days between each new food is the rule of thumb, and that is because if your baby happens to have a reaction to something, its much easier to pinpoint the culprit if you know he/she just tried a new food that day. This also gives your kiddo a chance to get used to the taste. Remember, your little tyke has never had anything but milk or formula so far, so this food business is pretty strange stuff!

Oh, and even though your baby can down a 6-oz (or larger) bottle of milk, that doesn’t mean they will eat 6oz of food! Not at all! Try for two or three tiny spoonfulls at first. Chances are, they will push most of it back out with their tongue for the first couple of weeks! But don’t worry, that is compeltely natural. God gave babies that natural reflex as a defense against choking – its a good thing!

You may think you’ve seen your baby make funny faces, but it’s likely that you will witness a whole slew of brand-new facial exrpessions when you start offering different foods. I remember when I first gave A peaches – Oh. My. Goodness. It was the funniest show ever! I’ve never seen him shudder or get his face so squished up since then! (I may or may not have continued to feed him just for the laughs. Go ahead and say it – I’m a horrible human being!) The thing is, just because they’re making faces doesn’t really mean they don’t like it. Turns out, A loves peaches, but it just took him a couple of tries for him to get used to the flavor.

Most importantly, you have to learn to roll with it! Go with the flow! Have fun and laugh! If your lovlingly prepared baby food ends up smeared all over your kiddo’s face, dribbled on bibs, and puddled on the floor, or if your docile little angel suddenly scowls at you and shivvers when the spoon touches his/her tongue… welcome to the land of spoon-feeding! And congratulations, because you and your delightful bundle of wiggles are completely and totally NORMAL!

Baby food: storage

I don’t know where you live, but here in Florida we are getting drenched! It’s been several years since we’ve had such consistent rain. I have a kiddo who likes to be outside, and we don’t have a yard, so it’s a challenge! The nice thing is that the rains keep the temperatures down.

Well, as I have mentioned before, I work full time. So, when I started on the baby food train, I immediately set out to come up with a streamlined process and method for storing it. After all, what would be the point of making it if I couldn’t manage it? In my last post I gave you a run-down of my method for making the food, so I figured it would only make sense to follow up with an explanation of how I stored it all.

I tried several different options, trying to figure out what worked the best for me. In the end, I used three different methods for storing it.

I ususally made large batches of food on the weekends, saved a couple of meals worth in the fridge, and froze the rest to prevent spoiling. I know some mommies who make their baby’s food fresh each day, and others who use a food mill and simply give their baby whatever the rest of the family was eating. I don't think there is any one best way to do this – you just have to figure out what works best for you and your lifestyle.

Here are the three storage methods I used:

Ice cube trays and freezer bags: Once the baby food was made, I kept a few meals worth in the fridge, and the rest I poured into ice cube trays. I didn’t measure it out – I just poured it into the little pockets and made them as even as I could. Once they were frozen solid, I stored them in ziplock freezer bags. Obviously, I didn’t bother with trying to make them pretty!

frozen baby food

image

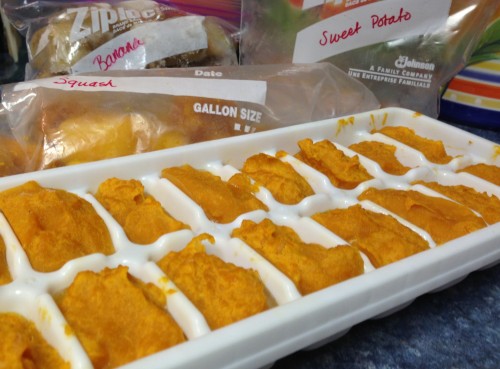
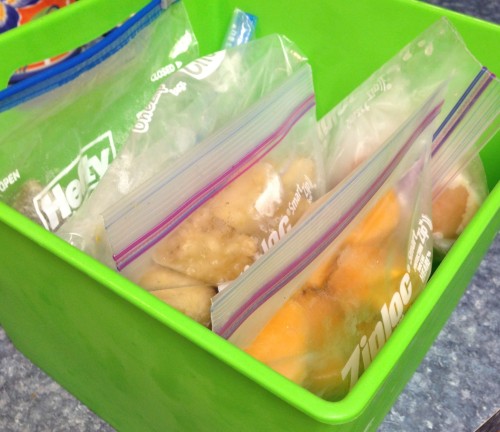
One tip here – always label your bags! I know it seems like you’d have no trouble telling them apart, but I promise you, once you have squash and sweet potato side by side, it can be really hard to tell! The same goes for those peas and green beans. They are different shades, but after a while, in your sleep-deprived state, you’ll get them all confused.

Storage containers:
I found these at BabiesRUs, and they really are nice becasue they have a rubber seal, which makes them virtually spill-proof. They also come with a little tray, which is nice, but not always convenient.

pTRU1-10941709dt

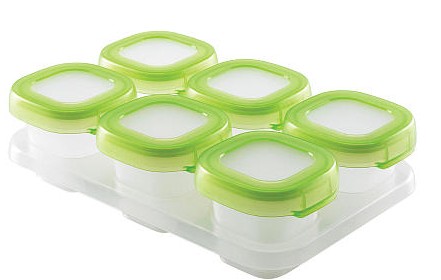
They were a little bit expensive, but they are a nice option. I have two sizes – the tiny 2-oz containers (pictured), and the larger 4-oz onces. They were nice for sending to daycare or when we stayed at someone else’s home and I wanted to take already made frozen food. I packed them in a an insulated bag and even though they thawed a little on longer road trips, they never spilled. I did use these for freezing food, but in general I used them more as take-along containers.
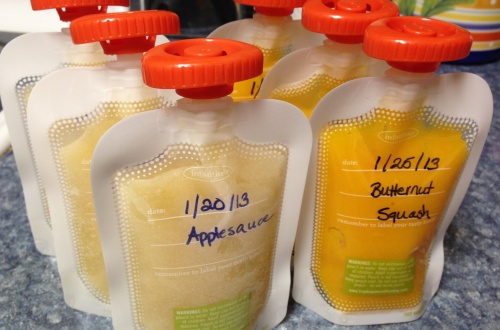
Pouches:
You know those handy little pouches of fruit you can buy for about $1 each? I love those things, but they are a little pricey. So, when I discovered the Infantino Squeeze Station, I was intrigued. This little treasure allowed me to make my own, which opened up the variety and also made it a little cheaper in the long run. I didn’t use these until A was a little older (almost a year), but ended up loving them. I try to keep a few of these pouches in the freezer at all times so I have a ready-to-go, healthy snack for A when we’re out and about. They are especially nice for when we are in the car, as it eliminates the need for a spoon. And let’s face it – that’s a big deal! I’ve put all kinds of stuff in these little pouches, including yogurt.

image

I have the squeeze station tool that makes them super easy to fill,

pTRU1-13902486dt[1]

but I’ve read that the puree can be poured in with a regular thin-spouted funnel. Personally, I never tried it that way and it sounds like a messy chore, but it might be worth a shot? I’ve found the whole kit and kaboodle at BabiesRUs, and Amazon. (You’re probably thinking those are the only two places I shop!) Extra pouches can be ordered online, and I’ve seen them in a couple of stores.
The biggest drawback to these is that they are not re-usable, so if you consider yourself “green” at all, you’ll want to look into something else. There are some different ones out there that are reusable, (click here and here for some examples). To be completely honest, I’m just too lazy busy, to bother washing them out!

Like I said, these are just the options I used and liked. You might find another method that works better for you. But until you figure it out, hopefully this will help to get you started.

Hope you all have a wonderful July 4th tomorrow! We’ve having a cookout – yum!!

Baby food: the basics

Hard? No.
Time consuming? A little.
Worth it? In my opinion, absolutely!

I made 95% of A’s baby food. At first I wondered if it would be complicated. I saw so many mommy blogs that had “recipes” for baby food which had multiple ingredients. They made it sound more complicated than it really is!

I never followed a single recipe. I didn’t do anything fancy either, and if you have access to some kind of blender (in some cases, a potato masher or a fork will work just fine), and a container to store the puree in, you’re ready to go! Seriously.

I always started with fresh fruit or veggies. Frozen will work, too, but I never did it that way. We have a farmer’s market close by, so that was my cheapest option.

I washed everything well, and peeled, chopped, de-seeded, trimmed stems, or whatever needed to be done.

image

Next I decided how to cook my choice of produce. Since it was all going to be pureed, I usually stuck to boiling or steaming. Although I prefer baking butternut squash… don’t know why! I normally cut or dice the produce into bite size pieces so it cooks quicker than popping things in whole.

image

Once the produce was thoroughly cooked and soft (could easily be squished with my fingers), I let it cool. I tried to blend it up once while it was still pretty hot, and that was a disaster! Don’t do it! (Just in case you’re curious, the heat/steam builds up like crazy in the blender, and ends up exploding all over when you remove the lid!) So, as I said, let it cool until pretty close to room temperature, and then blend with the same water you boiled the produce in. This way you don’t “water down” any of the flavor, and supposedly you don’t lose all the nutrients that are lost while boiling. You’d have to research how all that works if you want to know. I’m no nutritionist!

At first you’ll want to make it pretty soupy. Little babies just starting on solids can’t really handle anything that is much thicker than a creamy potato soup. 🙂 As your child gets older you can add less water, and leave more lumps if your child likes it that way. My kiddo has always liked his stuff completely smooth – no lumps! So, even when I started making it thicker, I always blended it really well.

Peas were never a success when I tried to puree them. For some reason they always seemed gritty. Maybe I just never cooked them long enough to be thoroughly mushy? If you have an answer for this, please let me know! I did have good success with the following:

Apples (boiled or steamed)
Pears (boiled or steamed)
Peaches (boiled or steamed)

(Generally I boiled the veggies – seemed to cook faster that way.)
Green beans
Sweet potatos
“Regular” potatos
Carrots
Summer squash
Butternut squash
Zucchini

A loved all of these… green beans were the most problematic, but I would just mix it up with something else that he did like, and he was happy.

I never pureed meat for A. He isn’t a fan of meat, and the thought of blending it up was revolting, so I didn’t! I also avoided pureeing legumes, because he had gas all the time! I figured I would try to help him out by not making the problem worse. 🙂

At the beginning, there is no need to make large batches since they eat so little. But once they start eating more, you can make multiple large batches at once, and freeze it. I got into the habit of making some every weekend while I cleaned the house, and I never felt like it was taking up a lot of time.

If you’re on the fence about making your own baby food, I definitely recommend at least giving it a try. It might be surprised how easy it is, and I promise you that your wallet will thank you! Not to mention it tastes so much better than the jarred kind.

P.S. I did keep a jar or two of store-bought puree in the pantry as back-up just in case, but I stuck to just the fruit ones because the others are so gross that my little guy refused to eat them!

I knew that having a baby would change things. Big time. I knew I wouldn’t have much time for my little hobbies. I knew that sewing, kitchen experiments, and pleasure reading would be pushed aside in favor of laundry, diapers, and picking up messes. I knew that writing would have to be put on hold as well, but I was secretly hoping I’d be a little better at carving out little bits of time here and there so I could indulge in my blog. Mostly because it’s fun. Sort of therapeutic for me, really. That may be an odd reason to blog, but, hey, it’s the truth!

Anyway, just wanted to let you know I’m still alive and kickin’! I’m actually starting to get more sleep… A has just started sleeping through the night at 15 months. 🙂 Although, last night there was a regression. We’re blaming it on his first set of molars. He’s a terrible teether. And slow at it to boot!

But, I’ve gotta say, even with all the sleeplessness, crying, and flat-out screams, he is so worth it! I have several friends who have just had their first baby or are close to their due date, and it makes me a bit nostalgic. The following expresses what I feel every time I think of our little buddy.

quote

I took this picture a few nights ago during one of his rare quiet moments. He was looking through his books and puzzles. I just gazed at him in wonder and thought about how blessed my friends will be with their own little ones.

Since I’ve had my little guy, I’ve had several friends ask me how I do this or that. How do I make his food? How did I decide about what kind of diapers? What games do you play with him? I figured since my current life leaves my crafting and decorating tendencies in the dust, I would adjust my focus and write about what I’m learning now: How to be mom. Maybe answer a few of the questions I’ve been asked, and voice my opinions. I know I will never learn it all, and I know there are many out there who are better at this game than I am, but I figure maybe I can help one or two other parents out there. And in the mean time, I’ll get in a bit of therapeutic writing! 🙂

Quick and healthy pancakes

I’ve been doing a bit more experimenting in the kitchen lately.  Mostly easy side dishes and things that require little prep work and minimal attention while cooking.

As all you fellow working moms know, once you get home at the “end” of the day, it’s like you step into an alternate reality, and in that alternate reality, the day has just begun!  But, you’re still running on energy left over from the first reality…
(Not to say that stay-at-home moms don’t get exhausted – I know you do, too! I’m just sharing from my current position.)

Anyway, back to my main thought.  Easy, quick food.  Well, if you like bananas, this is a winner!  I saw this idea floating around the web for a little while, but did not give it a try until recently.  Ready for the ingredient list?  It’s a doozey!

1 large, ripe banana

1 egg

That’s it.  Two ingredients. And it makes about 4 medium pancakes. Now, you can always add extras like I did.  Like chocolate chips, or strawberries, blueberries, or nuts… you get he picture.  I did blueberries and chocolate chips.

Anyway, you basically just mix up the banana and egg really well. I mashed the banana and then used a whisk to combine it with the egg. Then proceed to cook like any other pancake!  (Just in case you’ve never made pancakes: Pour some batter onto a medium-hot skillet, and when little bubbles start to pop on the top of the pancake, flip it over and cook for just a little while longer so both sides are a nice, golden-brown.)

I was expecting something heavy and not-pancake-y in the least, but these actually were not too different in texture from a normal pancake.  They are definitely more moist, and obviously, taste of banana, which is different. 🙂  But not bad, if you like banana!

And they look absolutely delicious, don’t you agree?

image

I highly reccomend having a side of bacon or sausage with these, so it counter-balances the sweetness of the pancakes.

If you try it, please let me know what your opinion is!

Ladies and Gents, I am alive! Hassled, a bit stressed, sleep-deprived, and just plain exhausted. Even bordering on delirious perhaps, but definitely alive!
And to prove it, I am going to share a new baked oatmeal recipe that I found and love! I found it on Pinterest, of course (After all, where else would someone like me find these things nowadays!). The original link is here:

http://alwaysamrsforeverakidd.blogspot.com/2012/01/gluten-free-baked-oatmeal-casserole.html

But, as usual, I did a little bit of tweaking… not a lot, but enough that I thought I would share my own version:

3 cups old-fashioned oats
1/3 cup sugar
1 teaspoon baking powder
1-1/2 teaspoon cinnamon
1/2 teaspoon salt
1/2 cup almond slices
1 cup strawberries (cut into small pieces)
1/4 cup mini dark chocolate chips
2-1/4 cups milk
1 large egg
1/3 cup applesauce (I used unsweetened, but you could use sweetened if you like)
1-1/4 tablespoon vanilla extract
1 banana, cut into 1/2-inch slices

I combined the oats, sugar, baking powder, cinnamon, salt, chocolate chips, and half of the almonds and strawberries in a medium bowl. I mixed well using a spatula, and then divided the mixture between two smaller, glass casserole dishes. I wanted to freeze half of it, or I would have done one, 9×12 dish. (Remember to use butter or non-stick spray on the dish first!)

Then, I used the same bowl to combine the milk, egg, applesauce, and vanilla. I whisked it together well, and ended up with a bit of foam on top… not sure if that was good or bad, but it ended up tasting ok in the end, so maybe it doesn’t matter either way?
I poured the liquid mixture over the oats, and then arranged the banana and remaining almonds and strawberries on top. I baked it at 375 for about 45-50 minutes. (Until the oats were golden-brown on top and no longer gooey.)

It was delicious!

image
I’m thinking I’d like to make this for dessert one time and serve warm with vanilla ice cream!